title: Linux代理配置 date: 2022-11-08 14:16:29 tags: 环境配置
Linux 代理配置
V2rayA
参考官方文档 v2rayA,已经比较详细了,笔者个人使用的是 Debian,ubuntu同理, 这里以它为例
- 下载并使用v2rayA 提供的镜像脚本
sudo apt install curl wget
curl -Ls https://mirrors.v2raya.org/go.sh | sudo bash
关闭服务
sudo systemctl disable v2ray --now
- 添加公钥
wget -qO - https://apt.v2raya.org/key/public-key.asc | sudo tee /etc/apt/trusted.gpg.d/v2raya.asc
- 添加 V2RayA 软件源
echo "deb https://apt.v2raya.org/ v2raya main" | sudo tee /etc/apt/sources.list.d/v2raya.list
sudo apt update
如果这一步update出错, 那就直接前往V2rayA下载包手动安装
wget <package.deb>
sudo dpkg -i <package.deb>
# 如果出现问题
# sudo apt-get install -f
- 安装 V2RayA
sudo apt install v2raya
- 启动并设置开机自启
sudo systemctl start v2raya.service
sudo systemctl enable v2raya.service
安装之后就可以访问到UI界面了 http://localhost:2017
如果是服务器配置的话还需要打开这个端口,入方向规则和出方向规则
创建账号,导入节点,这里直接使用V2free的用户的订阅链接即可
导入成功后SERVER中全选,测试HTTP连接,选择几个延迟较低的,应用即可
默认端口为20170(socks5), 20171(http), 20172(带分流规则的http) 端口
- 如果是桌面端的Ubuntu系统需要手动开启网络代理应用于本机(127.0.0.1)
127.0.0.1 20171 127.0.0.1 20171 空 空 127.0.0.1 20170 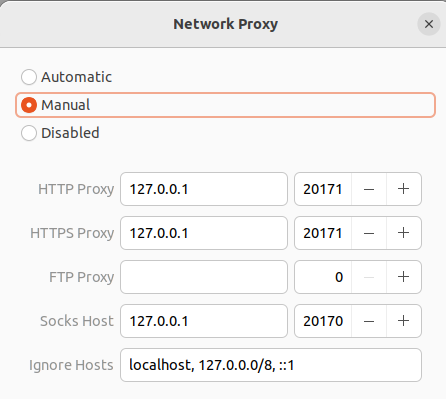
- 如果是服务器端可以在
.bashrc最后加入配置代理端口(不要忘记如果云服务器没开放这个端口要去云服务器网站手动开启这个端口的入出方向规则)vim ~/.bashrc加入
export http_proxy="http://localhost:20171"
export https_proxy="http://localhost:20171"
激活环境
source ~/.bashrc
clash for linux
进入clash的release,根据系统选择对应的文件
通常来说是linux-amd64,两个安装包都可以,选择第一个即可
wget https://github.com/Dreamacro/clash/releases/download/v1.12.0/clash-linux-amd64-v1.12.0.gz386是对于32位的,amd64是x86
下载完成之后解压得到可执行文件
gzip -f clash-linux-amd64-v1.12.0.gz -d授权可执行权限
chmod +x clash-linux-amd64-v1.12.0初始化执行
./clash-linux-amd64-v1.12.0初始化执行 clash 会默认在 ~/.config/clash/ 目录下生成配置文件和全球IP地址库:config.yaml 和 Country.mmdb
如果初始化出现问题可以到原网站手动下载
用wget下载clash配置文件,替换默认的配置文件,下面的wget命令后面的 你的Clash订阅链接网址 ,用上面的实际的clash订阅链接替换
这里的clash订阅地址需要到 https://me.tofly.cyou/doc/#/linux/clash 查看自己的
wget -U "Mozilla/6.0" -O ~/.config/clash/config.yaml 你的Clash订阅链接网址再次启动clash, 这里使用后台启动, 前台启动的话如果关闭当前终端则clash代理就终止了
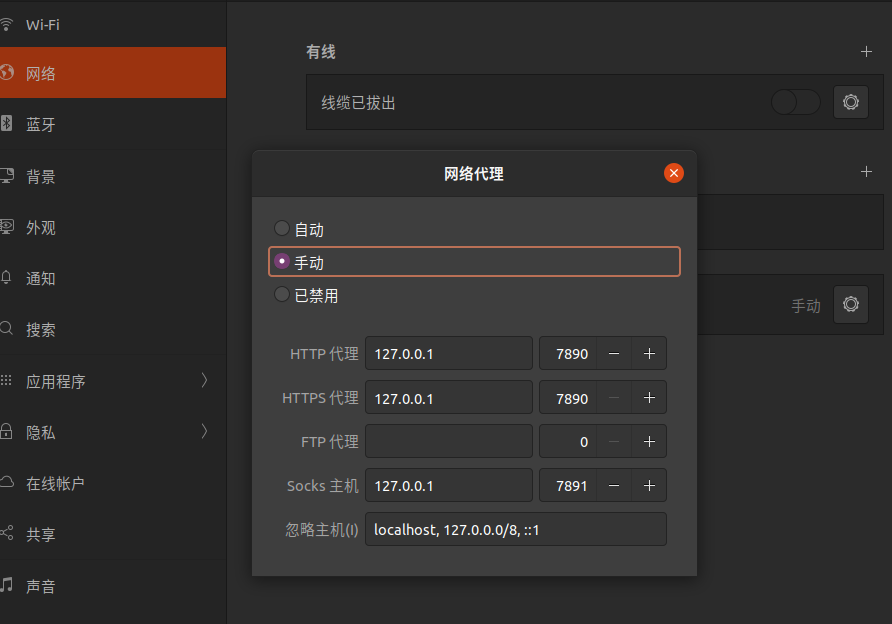
nohup ./clash-linux-amd64-v1.12.0 &clash 默认 http 端口默认监听 7890 , socks5 端口默认监听 7891
- 如果是ubuntu桌面端手动配置代理端口即可
- 如果是服务器端可以在
.bashrc最后加入配置代理端口(不要忘记如果云服务器没开放这个端口要去云服务器网站手动开启这个端口的入出方向规则)vim ~/.bashrc加入
export http_proxy="http://localhost:7890"
export https_proxy="http://localhost:7890"
激活环境
source ~/.bashrc