title: 深度学习模型部署(2)-服务器与本地 date: 2022-06-13 19:50:08 tags: python
既然是深度学习,那想必Python是主力开发语言了,这里我们暂时不考虑性能啊,响应啊,多线程高并发那么多,我们也不用什么java/c++写一个后台服务器,我们的任务就只是单纯的部署到服务器上,能用就行啊.
毕竟我都用python了,还要啥性能呢,对吧
那么,我们接下来就来使用以下python的一个库: flask
flask入门
我们先来构建一个网页,和专业的的Web,Nodejs功能相似,python自然有很多类似的库可以实现对应的功能,我们可以使用python的flask库来构建页面和
flask的中文文档比较全面,从快速上手到开发一应俱全,入门到入土可以说是一条龙,不过这并不是我们现在的重点
安装:
pip install flask新建文件app.py,复制以下代码
from flask import Flask

app = Flask(__name__)

@app.route('/')
def hello_world():
    return 'Hello World!'

if __name__ == '__main__':
    app.run()
运行,你可以看到如下结果
python app.py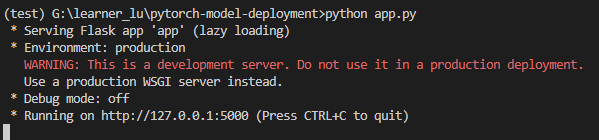
按住ctrl左键点击链接即可跳入对应网址,或者在浏览器中输入 http://127.0.0.1:5000
打开浏览器,很好,我们看到了一个简单的hello world
{% note warning %} 有可能会在运行时报错 cannot import name 'soft_unicode' from 'markupsafe' flask,那是因为你的pip版本老了,你可以uninstall flask然后升级pip重新下一个,或者升级markupsafe
pip install markupsafe{% endnote %}
flask进阶
那么,这些代码是什么意思呢
- 首先我们导入了 Flask 类。该类的实例将会成为我们的 WSGI 应用
- 接着我们创建一个该类的实例。第一个参数是应用模块或者包的名称。
__name__是一个适用于大多数情况的快捷方式。有了这个参数, Flask 才能知道在哪里可以找到模板和静态文件等东西
- 然后我们使用 route() 装饰器来告诉 Flask 触发函数 的 URL
- 函数返回需要在用户浏览器中显示的信息。默认的内容类型是 HTML ,因此字 符串中的 HTML 会被浏览器渲染
一头雾水,没关系,能用就行,python的库不都是这样么,(笑)
{% note success %} 值得一提的是除了python运行文件启动之外,我们还可以使用如下命令启动服务
flask runflask run提供了更多命令行可选参数
flask run --help如果电脑本机5000端口被占用了,那么也可以更换端口
flask run --port=5500但是需要注意这种情况下如果文件名为 app.py 或者 wsgi.py ,那么不需要设置 FLASK_APP 环境变量,否则需要配置一下环境变量,以(hello.py为例)
set FLASK_APP=hello
flask run
关于flask run 和 python .py的区别,请阅读这里
{% endnote %}
当然,没有必要一定是使用flask run,我们仍然使用python.exe执行文件即可,但是在实际服务器部署上的时候还是需要依靠flask的服务,也就是说并不能将一些预先的函数写在if __name__ == "__main__" 里,还是要写在整个python文件中处理,因为flask run是不会走这条分支的
通过调用run()方法启动Flask应用程序。但是,当应用程序正在开发中时,应该为代码中的每个更改手动重新启动它。为避免这种不便,请启用调试支持。
{% note info %} 你可能会感到奇怪,服务器呢? 127.0.0.1这不本机么?只有我电脑是可以使用服务,换个别的电脑肯定就不行了啊 {% endnote %}
没错,本篇文章的标题就是服务器与本地,所谓不要一口吃个胖子,渐进式的学习是有好处的,而且现在的代码只要稍作修改就可以放到服务器上了,我将会在下一节介绍如何在真正的服务器上搭建可以别所有人访问到的网站,并且将我们的模型部署上去
好,那我们再来进阶一步,现在页面显示的实在是有点糟糕,一个极其简陋的 hello world,我们能不能美化一下啊? 我们能不能搞一点触发事件? 一些CSS/JS?
--- 当然可以,我们可以得到这样的效果

将app.py修改为
from flask import render_template
from flask import Flask

app = Flask(__name__)

@app.route('/')
def index():
    return render_template('index.html')

if __name__ == '__main__':
    app.run(debug = True)
新建文件夹 templates,static
{% note warning %} 注意这两个文件夹是必建的,不只是为了模块化区分,静态网页部署需要这两个文件夹 {% endnote %}
新建"templates/index.html",复制以下内容
<!DOCTYPE html>
<html lang="en">
<head>
    <meta charset="UTF-8">
    <meta http-equiv="X-UA-Compatible" content="IE=edge">
    <meta name="viewport" content="width=device-width, initial-scale=1.0">
    <title>Document</title>
    <link rel="stylesheet" href="../static/index.css">
    <link rel="stylesheet" href="https://maxcdn.bootstrapcdn.com/bootstrap/3.3.7/css/bootstrap.min.css">
    <link rel="stylesheet" href="https://cdnjs.cloudflare.com/ajax/libs/font-awesome/5.15.3/css/all.min.css">
</head>
<body>
    <div class="inputBox">
        <input type="text" required="required" id="first_name">
        <span>First Name</span>
    </div>
    <div class="inputBox">
        <input type="text" required="required" id="last_name">
        <span>Last Name</span>
    </div>
    <div>
        <button onclick="getInputValue()" class="custom-btn btn-style">Submit</button>
    </div>
    <script src="../static/index.js"></script>
</body>
</html>
新建"static/index.css",复制以下内容
@import url('http://fonts.googleapis.com/css?family=Poppins:400,500,600,700&display=swap');
* {
  margin: 0;
  padding: 0;
  box-sizing: border-box;
  font-family: "Poppins", sans-serif;
}

body {
  display: flex;
  justify-content: center;
  align-items: center;
  min-height: 100vh;
  flex-direction: column;
  gap: 30px;
  background-image: linear-gradient(to right, #f6d365 0%, #fda085 100%);
}

.inputBox {
  position: relative;
  width: 250px;
}

.inputBox input {
  width: 100%;
  padding: 10px;
  border: 1px solid rgba(255, 255, 255, 0.25);
  background: rgba(255, 255, 255, 0.25);
  border-radius: 5px;
  outline: none;
  color: #fff;
  font-size: 1em;
  transition: 0.5s;
}

.inputBox span {
  position: absolute;
  left: 0;
  padding: 10px;
  pointer-events: none;
  font-size: 1em;
  color: rgba(255, 255, 255, 0.25);
  text-transform: uppercase;
  transition: 0.5s;
}

.inputBox input:valid ~ span,
.inputBox input:focus ~ span {
  color: #00dfc4;
  transform: translateX(10px) translateY(-7px);
  font-size: 0.65em;
  padding: 0 10px;
  background-image: linear-gradient(to right, #f6d365 0%, #fda085 100%);
  border-left: 1px solid #00dfc4;
  border-right: 1px solid #00dfc4;
  letter-spacing: 0.2em;
}

/* .inputBox:nth-child(2) input:valid ~ span,
.inputBox:nth-child(2) input:focus ~ span {
  background: #00dfc4;
  color: rgba(255, 255, 255, 0.25);
  border-radius: 2px;
} */

.inputBox input:valid,
.inputBox input:focus {
  border: 1px solid #00dfc4;
}

.custom-btn {
  width: 130px;
  height: 40px;
  color: #fff;
  border-radius: 5px;
  padding: 10px 25px;
  font-family: "Lato", sans-serif;
  font-weight: 500;
  background: transparent;
  cursor: pointer;
  transition: all 0.3s ease;
  position: relative;
  display: inline-block;
  box-shadow: inset 2px 2px 2px 0px rgba(255, 255, 255, 0.5),
    7px 7px 20px 0px rgba(0, 0, 0, 0.1), 4px 4px 5px 0px rgba(0, 0, 0, 0.1);
  outline: none;
}

.btn-style {
  border: none;
  color: #000;
}
.btn-style:after {
  position: absolute;
  content: "";
  width: 0;
  height: 100%;
  top: 0;
  left: 0;
  direction: rtl;
  z-index: -1;
  box-shadow: -7px -7px 20px 0px #fff9, -4px -4px 5px 0px #fff9,
    7px 7px 20px 0px #0002, 4px 4px 5px 0px #0001;
  transition: all 0.3s ease;
}
.btn-style:hover {
  color: #000;
}
.btn-style:hover:after {
  left: auto;
  right: 0;
  width: 100%;
}
.btn-style:active {
  top: 2px;
}
新建"static/index.js",复制以下内容
function getInputValue(){
    var first_name = document.getElementById("first_name").value;
    var last_name = document.getElementById("last_name").value;
    alert("Hello " + first_name + " " + last_name);
}重新运行python app.py , 打开浏览器尝试一下吧~
flask精通
好了,你已经是flask大师了,快去做一个像样的网页吧.我的链接传送门
flask还是有很多比较复杂的地方没有去讲,包括重定向,py和js之间的数据传输,我推荐一个教程网站,我个人认为说的还是很详细的,推荐感兴趣的朋友去看一下.
当然如果遇到py和js之间的数据传输的问题,我建议去看一下我的这个网站的源代码,ajax固然可以发送POST请求但是无法再实现网页的刷新即render_template一个新的页面,这令我很头大,具体的解决方法就是在div标签中加入数据项进行python->js文件的数据传入,从js传出python就还是要利用form表单的onsubmit. 我在这个项目中遇到并且解决了一些问题,可以去浏览一下代码
关于前端的网页编写,那基本就是看个人的html+css+js的能力了,我前端的本身水平不高,这个仓库有我的一些记录的例子,感兴趣的话可以参考一下
flask入土
这么快就入土了? -确实
运行服务器后,会发现只有您自己的电脑可以使用服务,而网络中的其他电脑却不行。默认的设置就是这样的,因为在调试模式下该应用的用户可以执行您电脑中 的任意 Python 代码。
如果您关闭了调试器或信任您网络中的用户,那么可以让服务器被公开访问。 只要在命令行上简单的加上 --host=0.0.0.0 即可:
但是我们之前提到过需要在服务器运行,所以如果你写好了app.py的话那么运行的话就是
flask run --host=0.0.0.0 --port=3000但是这样的话还是不行,因为它需要保证你的终端是开启的,一旦你关闭终端这个进程就会被杀死,所以我们需要将这个进程挂在后台
nohup flask run --host=0.0.0.0 --port=3000 2>&1 &如果要结束这个进程的话就去查找它的PID号然后杀死他
ps -ef
kill PID关于服务器的部署,我会把这部分的内容放到服务器的目录下方,如果你对服务器的网页搭建,IP端口访问,HTTPS连接的建立尚且不熟悉可以参考我的文章
到此为止我们的客户端/移动端访问网页的任务已经完成啦,值的一提的是服务器并不一定有GPU,所以在运行深度学习项目的时候算起来会有一点点慢,当然如果有财力的话可以直接购买GPU的服务器,对于一般的用户我们也就退而求其次设置一下CPU不是CUDA就完事了,但是不要忘记模型加载的时候也会需要一个map_location=torch.device('cpu')
如果不知道在哪里写的话运行的时候会有报错,按照说明改一下就可以了