glib
Glib 是一个广泛使用的 C 语言库,提供了许多数据结构、线程、消息传递、对象系统和其他功能.许多大型和知名的开源项目都使用了 Glib, 如 QEMU/GNOME/GTK/Systemd.
glib 的代码封装的很完善, 这里我们先介绍几种十分常见且有用的函数接口
sudo apt install libglib2.0-dev编译的时候
CFLAGS += `pkg-config --cflags glib-2.0`
LDFLAGS = -pthread `pkg-config --libs glib-2.0`
hashtable
C 并没有原生的 hashtable 的实现, GLib 提供了 GHashTable,它是一个高效的哈希表实现.你可以使用它来存储键值对,并进行插入、删除、查找和遍历操作. 如下是一个简单的使用案例
// src/glib/hashtable.c
#include <glib.h>
#include <stdio.h>

struct MyData {
    int x;
    int y;
};

// 回调函数,用于处理每个键值对
void print_key_value(gpointer key, gpointer value, gpointer user_data) {
    printf("Key: %s, Value: %s\n", (char *)key, (char *)value);
    struct MyData *data = (struct MyData *)user_data;
    printf("x = %d, y = %d\n", data->x, data->y);
}

int main() {
    // 创建一个哈希表
    GHashTable *hash_table = g_hash_table_new(g_str_hash, g_str_equal);

    // 添加键值对到哈希表
    g_hash_table_insert(hash_table, "name", "Alice");
    g_hash_table_insert(hash_table, "city", "Wonderland");
    g_hash_table_insert(hash_table, "occupation", "Adventurer");

    // 查找键值对
    char *name = g_hash_table_lookup(hash_table, "name");
    if (name) {
        printf("Found: Key: name, Value: %s\n", name);
    } else {
        printf("Key 'name' not found\n");
    }

    // 删除键值对
    g_hash_table_remove(hash_table, "city");

    // 检查键值对是否存在
    if (g_hash_table_contains(hash_table, "city")) {
        printf("Key 'city' found\n");
    } else {
        printf("Key 'city' not found\n");
    }

    // 使用 g_hash_table_foreach 遍历哈希表
    struct MyData data = {10, 20};
    g_hash_table_foreach(hash_table, print_key_value, &data);

    // 销毁哈希表
    g_hash_table_destroy(hash_table);

    return 0;
}- 创建哈希表:使用
g_hash_table_new创建一个哈希表,其中键和值都是字符串.
- 添加键值对:使用
g_hash_table_insert向哈希表中添加键值对.
- 查找键值: 使用
g_hash_table_lookup查找元素值, 使用g_hash_table_contains判断元素是否存在
- 遍历哈希表:使用
g_hash_table_foreach遍历哈希表,并对每个键值对调用回调函数print_key_value.
- 回调函数:
print_key_value打印每个键值对.
- 销毁哈希表:使用
g_hash_table_destroy销毁哈希表,释放内存.
g_hash_table_foreach 是 GLib 提供的一个函数,用于遍历哈希表(GHashTable)中的所有键值对,并对每个键值对执行指定的回调函数.它的函数签名如下:
void g_hash_table_foreach(GHashTable *hash_table, GHFunc func, gpointer user_data);hash_table:要遍历的哈希表.
func:用于处理每个键值对的回调函数,类型为GHFunc.
user_data:传递给回调函数的用户数据.
GHFunc 是一个函数指针类型,其定义如下:
typedef void (*GHFunc) (gpointer key, gpointer value, gpointer user_data);key:哈希表中的一个键.
value:与该键关联的值.
user_data:传递给g_hash_table_foreach的用户数据.
如果需要传入多个参数传给 user_data 可以创建一个结构体传入
事件循环
QEMU 作为一个持续运行的状态机, 需要不停地检查是否有新事件发生, 如果发生那么执行对应的一些处理. 我们可能会写出一个常见的 while 循环
while (1) {
    if (something_happened) {
        do_something();
    }
    // ...
}
但是实际情况可能比较复杂, 比如希望间隔 0.1 秒执行一次, 事件触发对应的回调函数, 可以在循环过程中注册新事件, 删除某些事件等等. glib 提供了一种简洁的事件循环接口
GLib 实现了一个功能强大的事件循环分发处理机制,被抽象成为 GMainLoop,用于循环处理事件源上的事件.每个 GMainLoop 都工作在指定的 GMainContext 上.事件源在 GLib 中则被抽象成了 GSource.在 GMainContext 中有一个 GSource 列表.GLib 内部定义实现了三种类型的事件源,分别是 Idle, Timeout 和 I/O.同时也支持创建自定义的事件源
基础用法
下面是一个简单的示例, 首先创建了一个主循环 loop. 然后使用 g_timeout_add 注册了两个回调事件. 第一个参数为间隔时间, 第二个参数为回调函数指针, 第三个参数是传参
然后通过 g_main_loop_run 进入主循环, 这是一个 while 死循环, 此时程序会执行所有的注册事件. 执行效果如下图所示
#include <glib.h>
#include <stdio.h>

gboolean count_down(gpointer data);
gboolean cancel_fire(gpointer data);

int main(int argc, char *argv[]) {
    GMainLoop *loop = g_main_loop_new(NULL, FALSE);

    g_timeout_add(500, count_down, NULL);
    g_timeout_add(8000, cancel_fire, loop);

    g_main_loop_run(loop);
    g_main_loop_unref(loop);

    return 0;
}

gboolean count_down(gpointer data) {
    static int counter = 10;

    if (counter < 1) {
        printf("-----[FIRE]-----\n");
        return FALSE;
    }

    printf("-----[% 4d]-----\n", counter--);
    return TRUE;
}

gboolean cancel_fire(gpointer data) {
    GMainLoop *loop = data;

    printf("-----[QUIT]-----\n");
    g_main_loop_quit(loop);

    return FALSE;
}
代码见 event_loop.c
GMainLoop 表示一个主事件循环.
GMainLoop* g_main_loop_new(GMainContext *context, gboolean is_running);context: 事件循环的上下文.传NULL使用默认上下文.每个 GMainLoop 都工作在指定的 GMainContext 上, 可以创建多个 loop, 也可以通过
g_main_loop_get_context获取某个 loop 所在的 context代码见 multi_context.c
is_running: 初始状态是否运行.通常传FALSE.
g_timeout_add 用于在指定时间间隔后调用回调函数.
guint g_timeout_add(guint interval, GSourceFunc function, gpointer data);interval: 超时时间,单位为毫秒.
function: 超时触发时调用的回调函数.
data: 传递给回调函数的用户数据.
回调函数用于处理事件.示例中有两个回调函数 count_down 和 cancel_fire, 返回值代表是否继续运行
- 创建主事件循环:
g_main_loop_new创建一个新的GMainLoop实例.
- 添加超时事件:
g_timeout_add添加两个超时事件,一个每 500 毫秒调用count_down,另一个 8000 毫秒后调用cancel_fire.
- 运行主事件循环:
g_main_loop_run启动事件循环,直到调用g_main_loop_quit退出循环.
- 退出和清理:在
cancel_fire中调用g_main_loop_quit退出事件循环,最后调用g_main_loop_unref释放GMainLoop实例.
自定义事件源
上例中我们创建了两个定时执行的函数, 但同时我们也希望可以注册一些自定义事件, 即当某些事情发生时执行某些操作, 并且可以灵活的添加删除终止
我们先来思考一下, 如何检查事件源是否有事件发生? 我们可以把事件源分为两类:
- 不与文件描述符关联的事件, 通常是一些纯粹的逻辑或定时事件
- 与文件描述符相关联的事件, 例如网络套接字、管道或文件. poll 用于等待这些文件描述符的状态变化,如可读、可写或出现错误, 只有轮询文件之后,才能知道文件事件是否发生.
详见 poll
glib 的事件循环的逻辑如下
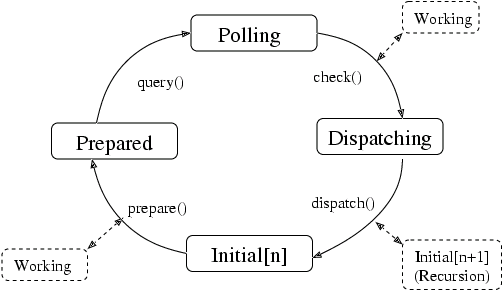
prepare:调用每个事件源的 prepare 回调函数,检查事件源是否有事件发生. 函数签名如下gboolean prepare(GSource *source, gint *timeout);source 指向当前正在处理的事件源. timeout 指示事件源希望主循环等待的最长时间(以毫秒为单位).
如果返回值为
TRUE说明该事件可以立即处理(例如idle类程序), 此时 timeout 参数无效.如果返回值为
FALSE, 则说明该事件等待 timeout 后处理.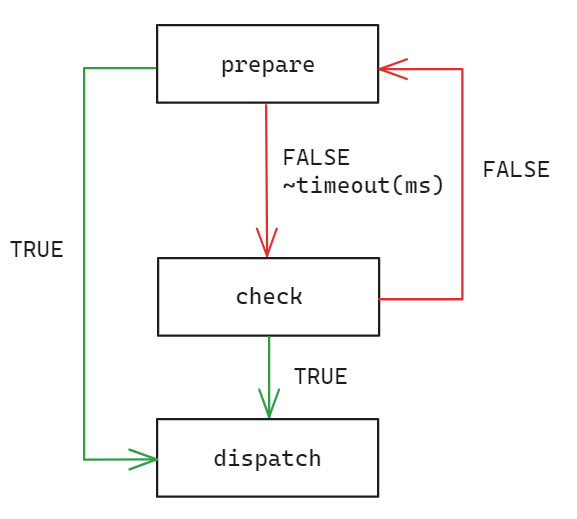
query:获取需要 poll 的文件 fd, 如果 prepare 返回 TRUE 则会直接跳过进入 dispatch 阶段
check:检查事件源是否有事件发生, 此时可以判断 poll 的状态
dispatch: 事件处理函数
我们先来看一个简单的自定义延迟事件, 自定义的事件源是一个继承 GSource 的结构体,即自定义事件源的结构体的第一个成员是 GSource 结构体, 其后便可放置程序所需数据. 整体的执行流程逻辑如下
- g_main_loop_run 通过调用事件源的 prepare 接口并判断其返回值以确定各事件源是否作好准备. 该事件返回 FALSE, 延迟 1000ms
- 此时 Glib 后端会在 polling 阶段检查所有 fd 的状态(在本例中不存在), 完成后再次询问该事件源是否作好准备,这一过程是通过调用事件源的 check 接口而实现的,如果事件源依然未作好准备,即 check 接口的返回 FALSE,那么 g_main_loop_run 会让主事件循环进入睡眠状态.主事件循环的睡眠时间是步骤 a 中遍历时间源时所统计的最小时间间隔,例如在 prepare 接口中可以像下面这样设置时间间隔.到达一定时间后, g_main_loop_run 会唤醒主事件循环,再次询问.如此周而复始,直至事件源的 check 接口返回值为 TRUE.
- 此时 g_main_loop_run 会调用事件源的 dispatch 接口,由该接口调用事件源的响应函数.事件源的响应函数是回调函数,可使用 g_source_set_callback 函数进行设定
#include <glib.h>
#include <glib/gprintf.h>

typedef struct {
    GSource source;
    gchar text[256];
    int counter;
} MySource;

static gboolean prepare(GSource *source, gint *timeout) {
    *timeout = 1000;
    return FALSE;
}

static gboolean check(GSource *source) {
    return TRUE;
}

static gboolean dispatch(GSource *source, GSourceFunc callback, gpointer user_data) {
    MySource *mysource = (MySource *)source;
    if (callback) {
        callback(mysource->text);
    }

    if (mysource->counter > 0) {
        mysource->counter--;
        printf("Counter: %d\n", mysource->counter);
        return TRUE;
    } else {
        return FALSE;
    }
}

static void finalize(GSource *source) {
    printf("Source finalized\n");
}

int my_callback_func(gpointer user_data) {
    char *text = (char *)user_data;
    g_print("callback func:%s\n", text);
    return 0;
}

int main(void) {
    GMainLoop *loop = g_main_loop_new(NULL, TRUE);
    GMainContext *context = g_main_loop_get_context(loop);

    GSourceFuncs source_funcs = {prepare, check, dispatch, finalize};
    GSource *source = g_source_new(&source_funcs, sizeof(MySource));

    g_sprintf(((MySource *)source)->text, "Hello world!");
    ((MySource *)source)->counter = 5;
    g_source_set_callback(source, my_callback_func, ((MySource *)source)->text, NULL);
    g_source_attach(source, context);

    g_main_loop_run(loop);

    g_main_context_unref(context);
    g_source_unref(source);
    g_main_loop_unref(loop);

    return 0;
}
另一个复杂一些的键盘输入案例见 keyboard_event_loop.c
IO自定义事件
I/O 类型的事件源要稍微难理解一些,因为涉及到了操作系统层面的 poll 机制.所谓 poll 机制,就是操作系统提供的对文件描述符所关联的 I/O 的状态监视功能 ,例如向文件中写入数据 ,那么 I/O 的状态可以表示为 POLLOUT, 而从文件中读取数据,那么 I/O 的状态就变为 POLLIN.
GLib 为 Unix 系统与Windows 系统的 poll 机制进行了封装,并且可以将文件与主事件循环的事件源建立关联,在主循环的过程中, g_main_loop_run 会轮询各个关联到文件的事件源,并处理相应的事件响应.
下面是一个简单的案例, 首先自定义事件中使用 GPollFD 保存所有监听的文件描述符, 本例中只有标准输入 STDIN_FILENO. 监听其输入 POLLIN 事件并使用 g_source_add_poll 添加到 Glib 监听列表
prepare 中返回值 FALSE 说明该资源需要等待, timeout 设置为 -1 说明无限等待来自键盘的 POLL 事件. 这里的会传入 poll 的最后一个参数
int poll(struct pollfd *fds, nfds_t nfds, int timeout);当 poll 返回并且 check 判断确实是 POLLIN 事件则进入 dispatch 处理
#include <fcntl.h>
#include <glib.h>
#include <poll.h>
#include <stdio.h>
#include <unistd.h>

typedef struct {
    GSource source;
    GPollFD poll_fd;
} FDSource;

// 自定义事件源的准备函数
static gboolean fd_source_prepare(GSource *source, gint *timeout) {
    *timeout = -1;  // 无限等待
    return FALSE;   // 不准备好,继续等待
}

// 自定义事件源的检查函数
static gboolean fd_source_check(GSource *source) {
    FDSource *fd_source = (FDSource *)source;
    return (fd_source->poll_fd.revents & POLLIN) != 0;
}

// 自定义事件源的分派函数
static gboolean fd_source_dispatch(GSource *source, GSourceFunc callback, gpointer user_data) {
    FDSource *fd_source = (FDSource *)source;
    if (fd_source->poll_fd.revents & POLLIN) {
        char buf[256];
        ssize_t len = read(fd_source->poll_fd.fd, buf, sizeof(buf) - 1);
        if (len > 0) {
            buf[len] = '\0';
            printf("Read: %s\n", buf);
            return TRUE;
        }
    }
    return FALSE;  // 错误或关闭文件描述符时返回 FALSE
}

// 自定义事件源的销毁函数
static void fd_source_finalize(GSource *source) {
    FDSource *fd_source = (FDSource *)source;
    close(fd_source->poll_fd.fd);
}

static GSourceFuncs fd_source_funcs = {fd_source_prepare, fd_source_check, fd_source_dispatch, fd_source_finalize};

int main(int argc, char *argv[]) {
    GMainContext *context = g_main_context_new();       // 创建新的上下文
    GMainLoop *loop = g_main_loop_new(context, FALSE);  // 使用新上下文创建主循环

    // 创建自定义事件源
    GSource *source = g_source_new(&fd_source_funcs, sizeof(FDSource));
    FDSource *fd_source = (FDSource *)source;
    fd_source->poll_fd.fd = STDIN_FILENO;  // 使用标准输入
    fd_source->poll_fd.events = POLLIN;

    // 将事件源的 poll_fd 注册到上下文中
    g_source_add_poll(source, &fd_source->poll_fd);
    g_source_attach(source, context);  // 将事件源添加到指定上下文中

    g_main_loop_run(loop);  // 运行主循环

    g_main_loop_unref(loop);        // 释放主循环
    g_source_unref(source);         // 释放事件源
    g_main_context_unref(context);  // 释放上下文

    return 0;
}
上例中我们对于来自 fd 的响应是通过 read 来接收的. Glib 中 GIOChannel 提供了一个更高层次的抽象,封装了 I/O 操作和错误处理,使代码更简洁和可维护. 直接使用 read 则需要更多的手动处理,包括错误检查和边界条件处理. 它可以很方便地集成到 GLib 的主循环中,通过 g_io_add_watch 处理异步 I/O 事件.
具体代码见 tcp_event_loop.c